Friday, December 13, 2013

Three Ways to Grill Prime Rib for the Holidays

 Three Ways to Grill Prime Rib for the Holidays

Prime Rib (standing rib roast) is a traditional Christmas feast that I've enjoyed most of my life. Every Christmas Eve, my stepmother (who is British) made a Prime Rib in the oven with roasted potatoes, au jus, and yorkshire pudding. It was a great welcome home meal. Now 30 years later, Prime Rib has become a welcome home meal for our adult kids too. We are excited to have 14 family and friends joining us this year for a Christmas Eve buffet. We've already got the menu mapped out:
  • Twice seared Prime Rib paired with slow roasted Beef Ribs
  • Horseradish Mashed Potatoes
  • Wild Rice Casserole
  • Winter Salad
I've been on a Prime Rib kick all year.  Like clockwork, rib roasts go on sale at Easter, Thanksgiving,
Prime Rib on sale during the holidays
Prime Rib on Sale during the holidays
and Christmas. I finally got smart at Easter and bought two! One for the freezer and one for the holiday meal. We're doing the same thing this Christmas and adding Beef Ribs to the buffet.

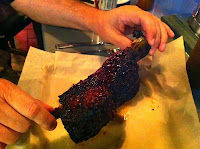
My journey to perfect Prime Rib on the grill also got me on a Beef Ribs kick. My appreciation for Beef Ribs took a major spike this fall when I visited Barn & Company with Dave Raymond (Sweet Baby Ray). Dave wanted to show me some of the best barbecue in Chicago and he introduced me to chef Gary Wiviott of Barn & Company who brought us the most beautiful and delicious Beef Ribs I had
Giant beef rib from Barn& Company in Chicago
ever eaten! I left Chicago on a BBQ high and a mission! Then, right on cue at Thanksgiving, there were Beef Ribs on sale packaged separately at the supermarket. A Beef Ribs Bonanza! Two great tasting parts from one gorgeous hunk of beef!

So here are three ways to take Prime Rib & Beef Ribs to your grill or smoker this holiday season:

  1. Primal Rib If you find a Standing Rib Roast the size of a Volkswagen it is a great candidate to cut your own “Primal Ribs” by leaving more meat on the bone for a meal of its own. The large 6-8 Rib Roasts with the bone in (not cut away by the butcher) is really two meals in one. We recently did just this and I had Chef Michael show me how to cut off a beautiful rack of ribs and then roll and tie up the boneless roast as normal. Don't try to serve those huge ribs and a slab of prime rib- it's way too much. Make it two meals if you want to make Primal Ribs!
  2. Beef Ribs & Prime Rib This is what we are grilling this year. We're buying extra Beef Ribs that have been cut by the supermarket butcher. Try to buy intact slab of ribs if possible. They are sold already cut into ribs and as well as slabs. Butcher cut ribs are cut much closer to the bone and are not nearly as meaty. We plan on serving a plate of beef ribs alongside the sliced prime rib. Folks can choose either or a bit of both.
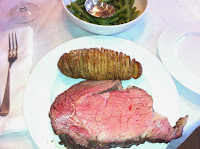
  3. red rare prime rib off the grillPrime Rib- Boneless or Bone In. The purest form is often the best. Just red, rare Prime Rib sliced thick. Sliced Prime Rib is ideal for buffets as a variety of rare to medium will suit many tastes. The Christmas red slices of Prime Rib is the star.

Here's my game plan for grilling #2- Twice seared Prime Rib and Beef Ribs

Prime Rib roast with beef ribsPreparation of Boneless Prime Rib Use butchers twine to tie the roast in a round shape for even cooking. Dry brine with salt 2-12 hours before cooking. Meathead from amazingribs.com suggests 1 teaspoon of salt per pound. Then apply the wet rub just prior to grilling.

Rub- Look no further than Meathead's Mrs. O'Leary's Cow Crust. This recipe makes enough paste for a 10 pound roast. I like how the paste sticks to the roast. Mix everything in a bowl and then add the olive oil.

seasoning prime rib
Ingredients:
2 tablespoons ground black pepper
2 teaspoons dried rosemary leaves
2 teaspoons dried thyme or oregano
1 teaspoon garlic powder
1 teaspoon onion powder
1 teaspoon paprika
1/2 teaspoon chipotle powder
5 tablespoons olive oil
prime rib on the smoker with beef ribs
Preparation of Beef Ribs. I've been using Denny Mike's Cowbell Hell religiously on my Beef Ribs. An overnight in the fridge is great, but even an hour or two of seasoning time helps.
Grilling Times & Temps. I use two grills, one for searing and one set low for the roasting.
  • Beef Ribs - 4 hours at 200-225F. (5 hours if you are cooking the Primal Rib). I learned from Gary at The Barn & Co. that it's okay to aim for 190F internal but get there very slowly which allows the fat and connective tissue to just melt away while the meat slow roasts on the bone. Bone down for 90% of the cook.
  • Prime Rib and Beef Ribs on the Yoder SmokerPrime Rib- Approximately 2 hours at 200-225F.  Meathead says cook to an internal temperature not by the clock. Ideally use a remote temperature probe like the ET 732 and monitor internal temperature. I pull the roast at 110F internal (early because I will sear the slices at the end of the cook) and let it rest before slicing as it will climb in temp a bit.
    Sear the Prime Rib in the beginning and at the end of the cook.
    Searing prime rib on hot grill prior to smoking
    Quick searing prime rib roast prior to smoking
    • I find a brief initial sear (3-4 min total) over high heat (450F) aids in crust formation and
      jump starts the maillard reaction for more flavor and you get to play with fire!
    • On either a gas grill or charcoal hold the Prime Rib end down for 15 seconds, lift and twist for another 15 seconds. Then flip to get the other end the same way. Then take 2-3 more minutes and sear the sides of the roast to get equal browning and off to the smoker it goes.
     Quick sear after slicing and just before serving.
    1. prime rib seared with beef ribs
      Primal ribs with twice seared prime rib
      I pull the Prime Rib off when the temperature reaches 110F internal (not yet even rare). The roast needs to rest a good 10 minutes so the juices do not just pour out when you cut slices. I'm aiming for medium thickness in the slices.  Back to the hot grill for 1 minute a side. We like the final sear for 3 reasons:  This gives an added flavor pop and a bit more browning. The slices will still be rare.
    2. You can cook to an individuals taste from rare to medium.
    3. Adds flexibility to timing and serving. Getting the buffet set and everything ready, then take those 2 minutes to sear and make sure the Prime Rib is hot and beautifully seared when it is brought to the buffet! Notice that we plan on sides that can also be warm and ready when the meat is done.

     Our game-plan is complete, we'd love to hear your holiday meal plans and traditions! 

Thursday, December 5, 2013

Holiday Grilling Tips & Survey

We are already in full planning mode for our holiday menus, especially the big feasts.  I'm a big believer in preparation and  logistics.  With that in mind here are a few simple tips to utilize your grill(s) and your griller for great holiday meals!

Holiday Grilling Tips from Chef Michael
  1. Use multiple grills to stage various parts of the cook- see our earlier blog post for more
  2. Use your gas grill as a warmer / holding box
  3. Dedicate a gas grill to grill a variety of vegetables at once and keep the work out of the kitchen.
  4. Use the GrateGriddle as an anti-griddle (cold plate) for serving food that needs to stay cool.
This year Susan and I are excited to have 16 people join us for dinner Christmas Eve. You bet I will be grilling!  AND I think a dry run is in order!

We'd love to hear what you plan on grilling for the holidays, your signature meals or questions you'd like to ask.  Please take our Holiday Grilling Survey

Grate Holiday Grilling Ahead! 
Got a Holiday Grilling Question?

Wednesday, November 27, 2013

Winter Grilling Set Up-

I winterized our deck!  I reconfigured the grills, bringing the Yoder Pellet Smoker front and center figuring its going to see more action this winter and the Kamado Joe likely will see less.   I rolled the Joe to the back of the porch content to have quick access out the kitchen door.  It only took one grilling to roll the Kamado Joe back too!  I missed the Roost Table from Select Outdoor Kitchens immediately.  The drawers are water tight and house lighters, thermometers, jars of pellets and more.  And I find I use the KJ for higher heat cooks and searing.

I expected a little push back from my wife but she just smiles and humors me.  As long as I keep on grilling I should be good to go.  I'm going to keep a journal on a calendar this winter to track which grill I use and what we grilled.  Tonight and tomorrow the Yoder gets big-time duty in the cold.  Looking forward to smoking our turkey on the YS400 tomorrow!  Happy Thanksgiving and Welcome to Winter Grilling! 


Tuesday, November 12, 2013

3 Easy Ways to Grill Your Thanksgiving Turkey

This year take the turkey out of the kitchen and outside to the grill where it belongs!  

Break the tradition of roasting your turkey in the oven and enjoy the camaraderie and flexibility of cooking your turkey on the grill. Freeing up your oven leaves more options for sides and desserts too. This year, grill your best bird and start a new tradition with these basic steps and 3 easy recipes from Chef Michael.
  1. Fresh is best. Buy a turkey that hasn't been frozen. Don't buy one with a pop-up timer, or one injected with oils and flavorings.
  2. Brining is a must. Even if the packaging claims a 'juicy' bird, brining is essential. If it does come with a pop-up timer, remove it! Do not trust a 5 cent apparatus to tell you when your bird is cooked properly.
  3. Use either a dual probe or instant read thermometer to monitor breast temperature to 160F and thigh to 180F
  4. Grill your turkey low and slow, ideally keep your grill below 350F.
You'll need a cooler or a trash can to brine the bird overnight. Making your own brine is easy or buy pre-packaged kits from Fire and Flavor. Brines are primarily a salt, sugar and water mix with spices and herbs. All three recipes below include an overnight brining. Complete recipes, preparation and grilling instructions are on grillgrate.com
  1. Spatchcocked and Brined Grilled Turkey. Not to be confused with butter-flying which is splitting the breast. Spatchcocking involves cutting out the backbone entirely and removing the keel bone or “breast plate” and flattening the breast. You will need heavy duty shears or a cleaver to cut through the ribs. Spatchcocking allows the thigh and legs to cook more directly while the breast meat won't overcook and dry out. Link to recipe
  2. De-constructed Maple Brined with Sugar Maple Smoke. One step beyond spatchcocking is to deconstruct the bird into parts. This allows for more flexibility and perfectly timed breast and thigh cooks. Grill the bird low and slow (350F or less) for maximum juiciness. The presentation of the parts is truly greater than the whole! Link to recipe
  3. Whole Roast Turkey with Sun Dried Tomato Pesto and Bacon. We suggest a roasting pan and rack if your plan is to grill the bird whole, but don't stuff it. Our friend Meathead is against stuffing turkeys. By the time the stuffing is cooked through, the meat is overcooked. Replace the stuffing with fruits and vegetables instead. This recipe includes a tomato pesto with bacon that is rubbed under the skin for added moisture and flavor. Capture the wonderful juices for gravy. Link to recipe
     
Let's Talk Turkey!
  • Ask questions of Chef Micheal
  • Share your turkey tips and pictures
Check out some grate turkey pics on Facebook and Pinterest too. 

Check out these fabulous side dish recipes from Charbroil! 

Wednesday, September 4, 2013

We Want YOU in the Next GrillGrate TV Commercial

Grab some grate video and win grate gifts! Nothing fancy or produced, just YOU telling us what you love about GrillGrates, your favorite food, a tip, what you won??? (That means YOU our steak champion friends!)

Simple Rules: Just video of YOU at YOUR GRILL with GrillGrates! Show us Your GrateTool!  etc.

Just grab your phone or video camera and answer 1 or more of these questions:
  1. We just want YOU to be YOU!
    What do you tell a friend about GrillGrates?
  2. What is your favorite feature?
  3. How long have you been using GrillGrates?
  4. Any awards and accolades?
  5. At some point please clearly state your full name  (very important)
MAX 2:00 Minutes 20 to 30 seconds is just grate!

We want to feature 5-7 grate customers in the 2014 GrillGrate TV commercial. This year's TV spot aired 5200 times April thru August. Our neighbors did a grate job acting out a flareup, and for the 3rd year Mike Mills of17th Street Barbecue anchors the spot. We love Mike! Everyone loves Mike!  

We want YOU! In the 2014 GrillGrate commercial.  DEADLINE to Enter 12/1/13
Submit via YouTube, Instagram, Facebook, email etc. 

ALL ENTRIES receive a new product!   
Grate Tongs of course!
( coming Oct 1)

Those appearing in the TV spot will receive a $200 gift certificate from Omaha Steaks!

We Want YOU!

We want you Lorraine!

We want YOU Maurice!

Monday, August 5, 2013

2-Zone Grilling with GrillGrate


2-zone grilling is another one of those GRATE DUH moments for me! I had the pleasure
2-zone grilling with GrillGrates on Broilmaster grill
Separating GrillGrates breaks their conductivity
of getting into a long conversation with Chris Finney the fellow who is widely credited with popularizing the reverse sear method for large cuts of meat. During our conversation he asked if I ever separated the GrillGrates on my grill to create a hot zone and a not so hot zone? Duh! That would be no! 

That night I put 2 GrillGrates to the left, 3 to the right and the gap was about 1” between them. I used my infrared gun to measure the temps at the GrillGrates and was floored by the extreme difference in temps I was able to achieve on my trusty old Charbroil grill.
2 zone grilling beets and hamburgers on Broilmaster grill
Left side is at 550F, the right is 350F


I used to have challenges grilling vegetables at the same time I grill steaks or burgers because they get grilled hot! Asparagus really doesn't grill well at 650F! Now I reduce the one side of my grill to low or off and have the other side hot as I need it.

We regularly roast corn, peppers, sweet potatoes, beets- you get the idea!

Please share your experience with 2-zone or any other creative ways to use GrillGrates!
Broilmaster 2 Zone
Charbroil 2 Zone

Thursday, July 25, 2013

PRE-Smoking on the Weber Kettle


Sept 27th Update.  Meathead (amazingribs.com) asked me to emphasize that pre-smoking is NOT COOKING it is a way to impart smoke then cook as normal.  Cold smoking fish and meat is a preservation process best left to the pro's.  Pre-smoking food followed by a normal cook still requires proper food safety handling and cross contamination awareness.  Be careful out there! We want all our grate friends and customers healthy!  Thanks Meathead! (the post below has been modified to eliminate the improper use of the word cold-smoking)

I've found a new use for my old Weber Kettle.  I only break it out for steaks anymore and the Kettle actually got removed from the deck... for a while. But the Weber Kettle is back on the deck and smoking again! 

smoking on a gas grill with Amazen Tube Smoker
Lit the tube before the grill
I recently added the A-Mazen Tube Smoker to my arsenal of grill tools.  It was all the rain we've had in Georgia that led me to purchase the Tube Smoker so I could bring more smoke to grilling ribs on my gas grill. My evolution as a griller has brought me to the threshold of achieving great smoke but only in the ceramic Kamado Joe which has seen little use with all the rainy weekends we've had this summer.

Boy was I impressed the first time I lit the A-Mazen Tube Smoker a few weeks ago. Once lit it smouldered beautiful smoke for more than two hours over a couple racks of ribs that were on my Charbroil low and slow. I have not stopped playing since.

smoking with pellets on a gas grillI have to interject a recent conversation with a customer who emailed pictures of BBQR's Delights pellets in the valleys of his GrillGrates. I emailed him back to ask about the smoke profile he achieved with the rib-eyes. “Some smoke flavor but not much” was Chris's reply.  He sent me to his post on the Virtual WeberBulletin Board where he shares his perfect way to grill smokey rib-eye steaks. His technique calls for using two grills:
  • Weber Kettle with lots of chips and low temps to pre-smoke and slowly bring the steaks up to temp. 
  • Then onto a very hot gas grill with GrillGrates to sear in the end.  
  • This technique is known as “sear in the rear”
This led me to the idea of pre-smoking steaks on the Weber before grilling them hot and fast as normal. No charcoal heat, just smoke for 20 minutes, A modified sear in the rear- Pre-Smoking followed by Hot Grilling!

Smoking steaks
Pre-Smoking on the Weber Kettle- No heat, just smoke!
Another tid-bit Chris shared is to bring the meat into the smoke cold- directly from the refrigerator as colder meat accepts smoke better. Hotter (grilled) meats do not accept smoke hardly at all. 

The salted steaks spent an hour on a rack in the refrigerator and then rack and all went onto the Weber with the Tube Smoker below puffing away Jack Daniels barrel flavored smoke. Whatever the outcome I was enjoying the process! I don't smoke cigars, but watching the Kettle billow smoke made me want to grab my scotch and a cigar! My wife astutely pointed out that I found a way to play with my meat longer!

All puns aside, I got a 'Standing O' from a very tough crowd! Of course we are repeating the process tonight to try it out on a few friends. Pre-smoking and hot grilling what a grate combination!

Thank You to 2 Grate customers for the inspiration and Meathead for his help on my misuse of the term cold-smoking!


August 8th Update.  My wife accuses me of trying to smoke everything!  Frankly she's right.  Tonight its salmon for a brief smoke prior to hot and fast grilling.

Thursday, July 18, 2013

Meet Chef Michael!

 Meet Michael Dellaporta! Michael has been our part time IT / Webmaster
for the past two years while working full time as a chef. Now he's flipping his career to become full time with GrillGrate for IT/Web support AND to become our corporate chef and culinary liaison to our customers. Sounds like a grate job, Welcome Michael!

Michael has been a professional chef for nearly 20 years; working in boutique restaurants in Vail, CO (BK... before kids) and most recently at a respected downtown restaurant here in Cartersville, GA. Over the past 2 years Michael has been my culinary advisor as well. He's done trade shows with us and has helped us gain business with commercial customers in catering, restaurant, and food service.

Michael will also help with recipe development, blogging, social media and YouTube videos. Michael is an avid griller. He owns two Weber grills- a Genesis Silver gas grill and his baby, a 18.5 inch kettle. He also owns a custom water smoker. A die hard lump charcoal guy, Michael grills 4-5 times a week. Now he'll be grilling once a week at the office too!
Grilling Lunch Once a Week, add to the job description!

Welcome Aboard Chef Michael!

Tuesday, June 25, 2013

GrillGrates Improve Couples Love Life!

We love getting feedback like this!  From Mike B. in CA

"60 years on the Planet, and 33 of them with the same Babe who has endlessly lamented the absence of nice uniform grill marks on her BBQ like she gets in the fancy steak houses. Then came my beloved Grill Grates. I waited 6 months to write you folks, after cooking EVERYTHING except Pizza. 33 years and the wife finally... truly... loves me totally. She has her perfect grill marks every time and even better, perfect steaks, ribs, chops, burgers, chicken (whole or part) and... so far everything else I have cooked. We have both enjoyed a literal change in our lifestyle because of Grill Grates, so we are building a 6' x 12' covered and windowed BBQ patio onto the house that has the grill opposite a window in the kitchen so we can cook 24/7-365 and hand the raw and cooked meals through the window, rain or shine! We cook our breakfast sausage on the Grill Grates... start slow, (off the flame) and then crisp over the flame. Real sausage casings will snap in your mouth like a rubber band. Bacon only gets slow cooked on Grill Grates at our house. No more messy pans or stove to clean, and the end results put a pan or Jenn Air to total shame. Grill Grates are by far and away one of the best darn BBQ inventions ever. Who would have thought Grill Grates could improve your love life?"

We're sending Mike a GrillGrate T shirt and looking forward to seeing a picture of him at the grill through their new BBQ window!
GrillGrate, Eat Well Mike! Thanks for writing!

Monday, June 24, 2013

Using Multiple Grills for Grate Dinner Parties

We've been doing a lot of entertaining lately being in a new house and with the onset of summer. We've been grilling big cuts of meat on multiple grills.  Using more than one grill to cook large cuts of meat such as prime rib (standing rib roast) and beef tenderloin really makes the job easier and in my opinion even more fun! 

multiple grills for dinner parties
The average griller owns 3.2 grills!
Firing up multiple grills for entertaining also makes it easier to bring a lot of family style sides to the table too. Stuffed onions, sweet potatoes, and corn have been our staples along with large salads and other sides brought by our dinner guests.

Here are five suggestions for entertaining at the grill.  Searing first (preferably on a charcoal grill or Kamado) followed by a slow roast is a common theme using 2 grills.

    • grilled prime rib roast, rare prime rib roast
      We like our Prime Rib a bit on the rare side!
      Cut away the bones (and grill separately as beef ribs) trim and tie the roast into best round shape for even cooking.
    • Consult Meathead for a nice crust building recipe and allow to rest at room temp for up to an hour before grilling.
    • SEAR over high heat for 5-10 minutes, moving and rolling it every 2 minutes.
    • Move to 2nd grill that is pegged at 300-350F to slowly bring the roast up to temp.
    • Use an internal thermometer and pull 5 degrees less than desired temp and allow to rest 5 minutes.
    • Slice thick- serve immediately.
    • grilled tenderloin, beef tenderloin on the grill
      Blue cheese stuffed onions 1 or 1/2 per person
      I prefer the pre-trimmed ones. Fold the thin end under and tie to create uniform round thickness.
    • Apply a thin coat of olive oil, salt and pepper liberally allowing to rest outside the fridge for 30 minutes before grilling.
    • SEAR over high heat – preferably a hot Weber Kettle open lid. Sear for 5 minutes rolling every minute to brown and sear.
    • Move to 2nd gas grill or smoker set at 350F and grill for 15-25 more minutes to desired internal.
    • A bearnaise sauce is suggested to pop the flavor on the beef.
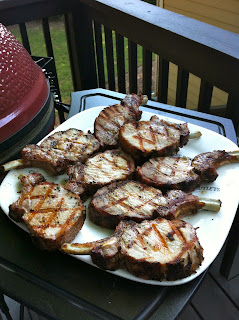
  1. Rack of Pork- Double seared with a twist!
    Grilled rack of pork
    Easy dinner party for 4 couples
    • Trim and season with Cavender's Greek Seasoning and allow to rest at room temp for 1 hour prior to grilling.
    • Sear on a hot grill. Lay rack meat side to the GrillGrates on a diagonal In two minutes lift and turn rack to the other diagonal for pretty sear marks and allowing time for the meat side to crust and brown. Turn and sear bone side down for 2-3 minutes.
    • Move to smoker or gas grill set at 300F and grill for 30 minutes to desired internal is close to 145-150F. (we still don't like our pork pink despite FDA lowering internal safe temp)
    • SEAR AGAIN. Remove the rack to a cutting board and cut into think chops one bone per chop. Take to hot grill and sear for 2 – 3 minutes a side. This adds another layer of searing and allows you to perfectly dial in doneness.
    • Marinate as much as 24 hours. My Father's London Broil recipe used Catalina and the sugar really breaks down the meat. 50 years later its still a great dish.
    • Grill fairly hot 15-20 minutes.  For thicker cuts a hot sear followed by longer roast is advisable.
    • Rest for just 5 minutes
    • Slice fairly thin across the grain.
    • Nice selection of rare to medium to appeal to all tastes
      Dry rub ( we often use Cavender's Greek Seasoning) or marinate and allow to rest at room temperature for 15-30 minutes prior to grilling.
    • Grill hot and fast, timed with with the other grilled sides etc.
    • Grill 5 minutes a side or less, rest only 3 minutes and slice thin across the grain while hot and serve immediately.
    • Pair with garlic toast or texas toast for a gourmet open face steak sandwich.  Grill an extra one for left-overs!

Monday, June 10, 2013

STEAK OFF # 3!

 I couldn't resist taking up Walmart's “Steak-Over” challenge, especially after Walmart hired my buddy Brett Galloway of USA Cook Team to be in one of their TV commercials. He grilled on GrillGrates at Southfork Ranch in Dallas-- how cool is that!

For steak-off #3 our gang had concluded that we needed to try a different cut other than rib-eyes since there is a lot of variation in the rib-eye steak. So it was to be sirloin for our next steak-off. That's when I remembered Walmart's campaign and headed to their meat department to
investigate. I like Walmart's campaign: surprising people after they ate a great steak, "Your steak came from Walmart- Surprise!" The commercials are fun and compelling and you can watch Brett's spot here.

I was delighted to see some very pretty, nicely thick NY Strips. I needed 8 and there weren't enough. I was even more delighted to find a Walmart associate who went to the back and brought out a whole tray of thick NY strips. I picked 8 that were similar.  They were in the $10-$11 range- not inexpensive- but the quality sure looked great. I grabbed a bag of Kingsford charcoal and we were all set for Steak-Off #3.

My buddies and I have gotten our timing down well on getting the four grills all up to 600-650F at the GrillGrates. I even started the chimney a bit a ahead of their arrival so we had some smoke billowing from the deck when they arrived with the salad and sides. Martinis preceded the lighting of the other grills!
  • Weber Kettle chimney full of Kingsford is lit first. The chimney is piled higher than normal for extra coals. I left a bed of the old coals from the last cook to bring the coals closer to the GrillGrates. The goal is one HOT Kettle.
  • Kamado Joe is lit next with lump charcoal. I picked out a few oversized pieces to keep the size as consistent as possible. Our infrared studies showed that more evenly sized lump radiates more even heat.
    Time to refresh the cocktails while we wait to light the other two grills in 15 minutes.
  • YODER Pellet Grill is plugged in, pellets loaded, switched on.  It's puffing smoke in 5 minutes which leans out quickly as it heads to 350F its pre-programed start point. The plan is to goose it to 550F once it reaches 350F. The heat deflector is removed and we're grilling with GrillGrates right over the burn pot.
  • Charbroil Gasser is the last to fire up as it heats up fast. It was 650F at the GrillGrate in less than 10 minutes! I never had the grill on high and it was bumping 700F before the other 3 grills and I had to back it down a bit like a galloping horse!
The “gals” had the steaks (seasoned only with salt and pepper) plated on 4 separate plates, and onto Phase Two!  HOT and FAST grilling 8 very nice NY strips, 4 grills, lots of sizzle and smoke! No one even asked about the meat. Timing becomes critical to grill each steak to medium rare erring to the rare side. We want to work each grill to its best, running each grill hotter than I grill any other foods. Steaks (in my opinion) cook better at hot temps. The reverse sear crowd will argue with me on that one. I defer to the competition teams that primarily are grilling hot and fast too.

My buddy Don is always pushing to remove the steaks too soon. Thankfully our trusty instant read thermometer keeps us well informed. The goal is to pull at 120F and give the steaks a very short rest before Susan cuts them into quarters for everyone to get a good size piece of all 4 steaks. The plastic tooth-pic plate looks mouthwatering and we sat down to another grate meal.

The steaks all looked similar and the cook was very consistent, every one agreed the most level
playing field yet. It was interesting to see the difference in the strips from the first taste to a later bite as the steak cooled down and firmed up a bit. Everyone agreed on the deliciousness of the steak and voting was tough.
  • The Kamado Joe won by a resounding margin!
  • The Weber Kettle and Charbroil TIED for 2nd. This was the first time that the Charbroil placed better than dead last. 
  • The Yoder pulled up the rear after being strong tied for 2nd in Steak Off #2
Conclusions- BRING the HEAT when Grilling Steaks!   The Kamado Joe probably ran a bit hotter followed by the Charbroil and the Weber. The Yoder was at 600F but likely could not hold it as well as the other grills.

I encourage you to have your own steak-off with your grilling buddies!
Simple guidelines:
  1. A Weber Kettle and Kingsford Briquettes are essential to compare to all other challengers!
  2. A gasser equipped with GrillGrates is also essential.
  3. A 3rd and 4th grill is not mandatory but fun to add to the mix. A Kamado, or Off-set Smoker (think reverse sear) is ideal.
  4. Buy good steaks, and take a look next time you are in Walmart- look for their Steak-Over signs!
  5. We'll post the scoring sheets we've developed shortly- if anyone want me to email click here.
Let us know if you have your Steak-Off and send any suggestions for future ideas.  The one that I am toying with is reverse sear- versus hot and fast on thick steaks, ummmmmm....

PS- I did not get any grief when I announced at the end of the meal the steaks came from Walmart!  Everyone agreed they were worthy!  

GrillGrate, Eat Well!